Showing posts with label pulp painting. Show all posts

Wednesday, June 10, 2020

Rainbows in Lockdown

 It has been over a year since I last posted and one of the first things I said I'd do was to update my website, sorry that hasn't happened yet and I've had three months!!!
I'm posting this here as an addition to the Papermakers of Victoria magazine The Deckle Edge. I wrote an article about making some rainbow paper but there wasn't room for all the images so here is the article with all the images:-

Rainbows and light


When Anne Pitkethly threw out the challenge to put a paper rainbow in my window I accepted and broke up a batch of recycled letterpress paper into five lots. I dyed them red, yellow, green, blue and purple. I made my rainbow on a mould by pouring the pulp and couching onto a readymade sheet of paper. I then had lots of coloured pulp left over and I made some sheets with a watermark of my old school motto ‘Respice Lucem’ that means ‘Look to the light’. I already had the text cut out of waterproof cloth tape and stuck to fibreglass fly screen that fits on a mould the right size to fit one of the small lamps from IKEA. 

I needed an A3 sized vat for those sheets and was able to pull two of each colour before I drained the vat and started again with the next colour. I have put the watermarked sheets in my window along with my teddy bear and my pulp painted rainbow. I can read look to the light from the inside it could be interesting to see how lightfast the dyes are.


After emptying the vats I still had quite a bit of the coloured pulp left so thought I’d try some pulp marbling. I first learned about this technique from Christine Ballinger at the IAPMA Congress in Adelaide in 1998 and had only used it once before when I was doing a lot of floral pulp paintings and I made a vase using the technique.  What you need is formation aid and although I haven’t tried it you might be able to use okra or prickly pear. Have water and formation aid in a vat deep enough to cover the mesh of your mould but not so deep that it covers the deckle.

Weigh down the deckle so that it doesn’t float off. Mix some formation aid and water with your pulp so that it has the consistency of pouring cream; use a sauce bottle, turkey baster or slip trailer (ceramic tool) to pour the pulp onto the mould.


Once you have coverage you can use a skewer to move the pulp around.  


When happy with the result couch the sheet, then to support it couch another sheet on top or do as I did and couch onto a readymade sheet.

The dry sheet

Sunday, December 16, 2012

Christmas

Merry Christmas and Happy New Year

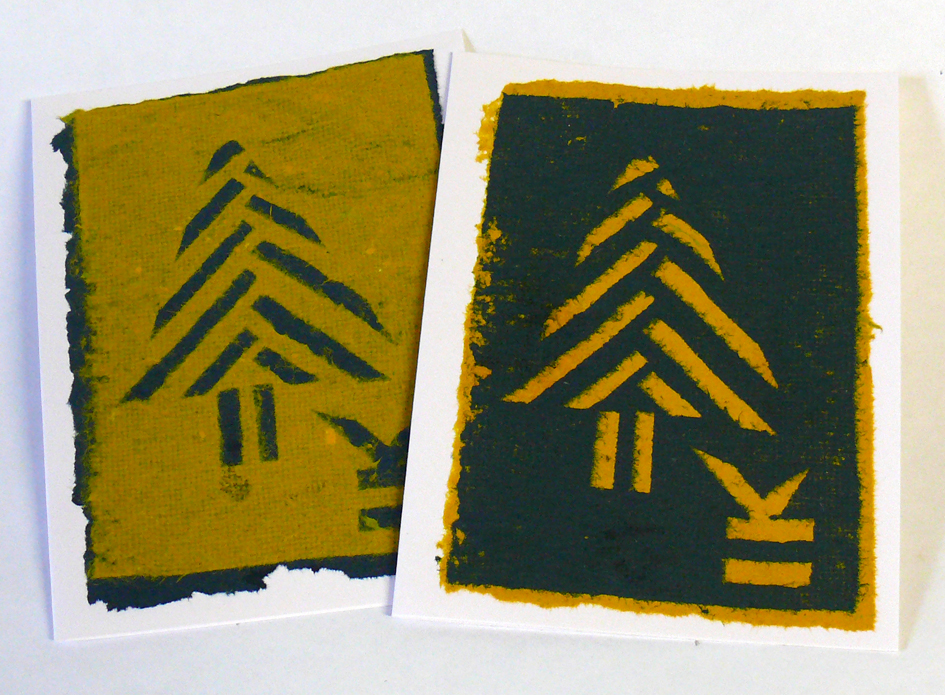
It took me a while to come up with the design for my Christmas cards and I needed to get them done in a hurry. Here is what I came up with. I had the yellow and blue pulps for some other projects (My cards for the Yabbers, Sabuda cards that I bought in the US and have embellished and invites for a wedding) and used stencils to make the designs in fine recycled pulp.

The full sheets an two variations

Noel on white card


Presents on white card

Stripe tree on white card

Spotty tree on white card
The mould with gaffer tape stencil

Sunday, March 18, 2012

Bugs and Books

This coming Tuesday I am heading to Clunes for a Bug Blitz Day. The whole of Clunes Primary School will be participating in various nature activities like biodiversity assessment, honey tasting, bird watching, aboriginal knowledge and papermaking. Since the theme is bugs I decided to make some new buggy stencils for pulp painting, I hope they're not too freaked out by centipedes and spiders!!!
Last week I picked up some papers for recycling and discovered lots of envelopes and matching paper for cards and since I'm right out of cards I decided it was time to get a few made. I already had lots of cast squares that I'd decorated in different ways (workshop samples from a couple of years ago!), so I combined then with some squares of hanji and here are a few.


Box Hill Community Arts Centre has its annual discarded exhibition starting in a week or two and since the sub theme this year is Paper Cuts I felt I should participate. I traipsed around the suburbs taking photos of hard and garden rubbish noticing just how many televisions were on nature strips so I decided to make a tunnel book, I made the paper from mixed plant fibre (garden waste!) and printed the photos and text on. Here are a few pics. I called the book 'Obsolete'.


Tuesday, June 7, 2011

Paper bash for global understanding

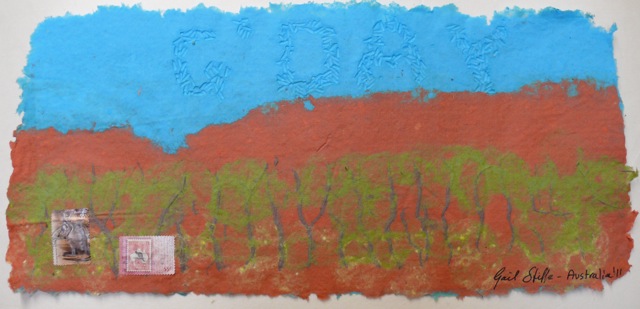
My piece G'day for the exhibition Paper Bash for Global Understanding to be held in the Philippines in September this year.


Artist Statement G’Day

In my piece for Paper Bash for Global Understanding I decided to produce a fairly typical landscape from Central Australia and combine it with an expression typically Australian in G’day. By producing the lettering with rice I am making a connection with The Philippines where the work will be displayed. The work has been made from recycled archival board that has been dyed with Cartesol dyes that are used in the paper industry. I chose to use recycled paper rather than indigenous plant fibre paper because of the way the pulp reacts and because of the vibrant colours available to me. The work is a pulp painting made by double dipping and manipulating the paper fibres.

Thursday, February 4, 2010

new work and old

Since joining the magic carpet blog ride I have been trying to get to look at all the blogs of people who've left comments on mine but it is slow progress, my apologies if you are waiting for a comment from me, I don't know how Lisa does it, she has looked at all of the over 900 blogs. You can see the gifts I'm giving away in the post below this one.

I have been trying to get a few work things done in the last week or so and to prepare for some workshops I'm running later in the year. I've spent the last two days working on some A2 pulp paintings inspired by Apollo Bay, here they are with the photographs that provided the inspiration, I intend to add the birds and the cray pots later as digital images.


Here is the one that got away, I rather like the look of it so I am keeping it to see how it looks once it is dry luckily I had three of that one.

Here is my large vat and my trusty press! My standard press only handles up to A3.

The other thing I've been doing is tidying up the room my younger daughter moved out of so that I'll have a workroom and a place to run workshops at home. I have also been cleaning up my other room and consolidating all my paper, I now have two large containers of collage bits, I used a miniscule number of the scraps to make these cards and a few others.

In my cleanup I found this writing set.

And these books which I made many years ago.


Looking at them now I feel that they need some text or something so I am thinking of asking if anyone would like to embellish two in exchange for one of the books. I have two slightly different copies of the body book and a book of fossils that could be a companion to the shell book. Leave me a message if you are interested, either an email or a comment on this blog.

And I forgot to say, I'll be hanging about a dozen of my 2D in the Alcove Art Shop at Box Hill Community Art Centre, they'll be there for two months from this coming Saturday.

Sunday, December 14, 2008

More Christmas

What was that I said about it being hot at Christmas time, it has hardly stopped raining since then but here are some of my cards drying on the fibro sheets. I was planning to get the cards written today but somehow the day has disappeared.


The other day I made a slip case for my sample Aussie fibre book, now I need to make up some notes for both the book and the slipcase and work out if there will be time to do both in a one day workshop.