
We had our yabbers breakup lunch yesterday and did our card swap, here they are sitting on our piano. They are all very individual and very special.


I made mine from cotton linter beaten together with offcuts of heavyweight Hoshu paper (machine made highly refined kozo). I divided my 15 x 31 cm moulds into three by sewing knitting needles onto the mesh and had precut shapes from oriental paper left over from my ornament book kits and the workshops I did for Art Education Victoria. I placed the shapes on the paper before couching and they became laminated to the paper. Here are some pictures of them drying on the fibro sheets, you can see the lines left by the knitting needles, the paper held together enough to feed through my printer so I could add the greeting then it was easy to work out where to tear the sheets apart. I used a feature I've learned this year of dropping images behind text using the opacity feature in photoshop.


Now to print and send them out!
I thought I'd share the instructions for the ornament books I designed earlier this year so here are the instructions and some pictures showing the folds.
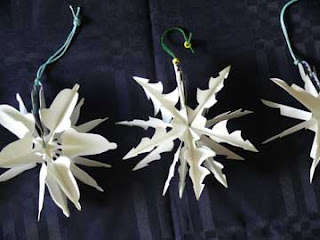

Ornament Book
Materials:
· 5 squares of heavy white paper 10 x 10 cm
· 3 squares of light card 5 x 5 cm
· 2 squares of decorative paper 5 x 5 cm
· 40 cm thread or thin ribbon
· two beads
Tools:
· scissors
· gluestick
· needle for threading thread or ribbon through beads, may not be needed
Method:
· fold each white square in half diagonally
Materials:
· 5 squares of heavy white paper 10 x 10 cm
· 3 squares of light card 5 x 5 cm
· 2 squares of decorative paper 5 x 5 cm
· 40 cm thread or thin ribbon
· two beads
Tools:
· scissors
· gluestick
· needle for threading thread or ribbon through beads, may not be needed
Method:
· fold each white square in half diagonally

· turn each one over and fold in half both vertically and horizontally

. push the diagonals in so that you end up with a smaller square

· take one of the squares of card and draw your design, note that the design needs to be on the diagonal.
· cut out your design to use as a template
· Cut the design out in the paper squares and glue them together back to back ensuring that the folded corners are aligned
· glue the squares of decorative paper to the remaining two squares of card
· use your template to cut your design from the decorative card making sure that you turn your template upside down for one of the cards so you end up with a front and back cover.
· glue the thread or ribbon to the back cover with the halfway mark at the folded end of your design
· glue on your stack of pages
· glue the thread or ribbon to the top sheet
· glue the front cover on
· press
· thread the ends of the thread or ribbon through a bead
· tie a knot 10cm from the book
· thread the other bead through one strand and tie the thread or ribbon around the bead
· slide the first bead away from the book and turn around so that the covers meet back to back
· slide the bead back to hold the book open.
I learned some cool stuff at this week's photoshop course though I don't quite understand how it works but here are a couple of examples I worked up myself with the original photos included. By the way I was very pleased that I sold the two blueish collages at the Burnley Harbour exhibition last weekend.


